How to Ensure Quality When Purchasing Class 600 RTJ Flanges?
Ensuring quality when purchasing Class 600 RTJ flanges requires a comprehensive evaluation process that examines material certifications, manufacturing standards, dimensional accuracy, and supplier credentials to guarantee reliable performance in high-pressure applications. Quality assurance begins with verifying that flanges comply with ASME B16.5 specifications, reviewing mill test reports that document chemical composition and mechanical properties, and confirming proper heat treatment processes have been applied. Buyers must also inspect groove geometry precision, surface finish quality, and marking legibility while validating that manufacturers maintain ISO 9001:2015 certification. Class 600 RTJ flanges are very important in petrochemical plants, power plants, and offshore platforms where the safety of operations depends on the integrity of the connections. This means that when you buy them, you have to do a lot of quality checks.
Verifying Material Certifications and Compliance Standards for Class 600 RTJ Flanges
Understanding Essential Material Documentation Requirements
When buying Class 600 RTJ flanges, material traceability is the most important part of quality assurance. This is because complete documentation shows that the parts fulfill the criteria and makes everyone in the supply chain responsible. A mill test record tells you a lot about the chemical make-up, mechanical qualities, heat treatment settings, and test results. These papers show that the things are made to meet standards like ASTM A105 for steel made of carbon and ASTM A182 for steel made of metal or stainless steel. These certifications should include heat codes that are unique to each batch of steel used in the manufacturing process. This way, purchasers can track the materials back to the original production records. Class 600 RTJ flanges purchased without proper material documentation create substantial risks, as unverified components may contain improper alloy content, inadequate strength properties, or hidden defects that compromise pressure boundary integrity. Quality-focused buyers establish procurement specifications requiring 3.1 certificates per EN 10204 standards, which include independent third-party verification of test results rather than relying solely on manufacturer self-certification.
Validating Manufacturing Standard Compliance
Ensuring that Class 600 RTJ flanges conform to recognized manufacturing standards provides confidence that dimensional specifications, tolerances, and quality control procedures align with industry best practices. ASME B16.5 establishes authoritative requirements for pipe flanges including pressure-temperature ratings, dimensions, tolerances, marking requirements, and testing protocols that manufacturers must follow. Buyers should verify that purchased Class 600 RTJ flanges display permanent markings indicating manufacturer identification, material grade, pressure class, and nominal size as mandated by applicable standards. The manufacturing process typically involves forging operations that refine grain structure and enhance mechanical properties compared to cast alternatives, with forging quality verified through ultrasonic examination or other non-destructive testing methods. Reputable manufacturers maintain documented quality management systems certified to ISO 9001:2015, demonstrating organizational commitment to consistent processes, continuous improvement, and customer satisfaction.
Assessing Supplier Quality Credentials
Selecting suppliers with proven track records manufacturing Class 600 RTJ flanges reduces procurement risks associated with quality deficiencies, delivery delays, or inadequate technical support. Buyer due diligence should investigate supplier certifications including ISO 9001:2015 quality management systems, API 6A monograms for wellhead equipment applications, and Pressure Equipment Directive compliance for European markets. When you ask suppliers for reference lists, you may talk directly to current customers about how well the products work, how reliable the delivery is, and how quickly the technical support responds. Site audits of manufacturing facilities offer opportunities to observe production processes firsthand, evaluate equipment capabilities, review quality control procedures, and assess organizational competence managing complex technical requirements for Class 600 RTJ flanges.
Inspection Protocols and Dimensional Verification for Class 600 RTJ Flanges
Critical Dimensional Measurements and Tolerances
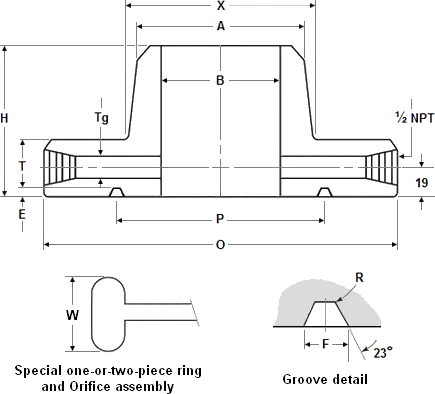
Dimensional accuracy determines whether Class 600 RTJ flanges achieve proper fit-up with mating components and maintain sealing integrity under operating pressures. Key dimensions requiring inspection include flange outside diameter, bolt circle diameter, bolt hole quantity and spacing, hub thickness, and overall flange thickness. The ring-type joint groove represents the most critical feature of Class 600 RTJ flanges, demanding meticulous verification of groove diameter, depth, width, and radius dimensions that must align precisely with gasket specifications to achieve effective metal-to-metal sealing. Groove surface finish measurements using profilometers confirm that machined surfaces meet roughness requirements, typically specified as 125 microinches Ra or smoother. Buyers conducting receiving inspections should utilize calibrated measuring instruments including calipers, micrometers, and coordinate measuring machines as appropriate for required accuracy levels.
Non-Destructive Examination Methods
Non-destructive testing identifies internal and surface defects in Class 600 RTJ flanges without compromising component integrity. Liquid penetrant examination applies colored or fluorescent dyes to component surfaces, revealing cracks, laps, seams, or porosity that could propagate under pressure loading. Magnetic particle testing magnetizes ferromagnetic materials including carbon and low-alloy steel Class 600 RTJ flanges, then applies iron particle powder that accumulates at locations where surface or near-surface defects disrupt magnetic flux patterns. Ultrasonic examination transmits high-frequency sound waves through material thickness, detecting internal flaws such as laminations, inclusions, or porosity based on reflections from discontinuities. Acceptance criteria for non-destructive examination follow standards such as ASME Section V, establishing defect size limits that balance manufacturing capabilities against fitness-for-service requirements.
Visual Inspection and Surface Condition Assessment
Visual examination provides fundamental quality verification for Class 600 RTJ flanges, identifying obvious defects, marking legibility, and general workmanship quality. Inspectors examine flange faces for gouges, scratches, dents, or corrosion that could interfere with proper gasket seating. Bolt holes require inspection for proper drilling quality including absence of burrs, cracks, or thread damage that could complicate assembly or reduce connection strength. Overall cleanliness assessment confirms that Class 600 RTJ flanges arrive free from excessive rust, mill scale, or manufacturing debris. Marking inspection verifies that manufacturer identification, material grade, pressure class, and heat numbers remain legible and match documentation provided with shipment.
Testing Requirements and Performance Validation for Class 600 RTJ Flanges
Pressure Testing Procedures and Acceptance Criteria
Hydrostatic pressure testing validates the structural integrity of Class 600 RTJ flanges by subjecting assembled connections to pressures exceeding design ratings. Standard practice requires testing at 1.5 times the design pressure rating, meaning Class 600 RTJ flanges rated for 1440 psi undergo testing at approximately 2160 psi, with test pressure maintained for specified durations while inspectors examine joints for visible leakage. Successful pressure testing demonstrates that Class 600 RTJ flanges, associated bolting, and gasket installations function as designed, providing confidence before introducing hazardous or valuable process media.
Mechanical Property Verification
Mechanical testing quantifies material strength, ductility, and toughness properties that determine whether Class 600 RTJ flanges possess adequate structural capacity for intended service conditions. Tensile testing puts more and more weight on standardized samples to find out their yield strength, ultimate tensile strength, and elongation values, which must all exceed minimal standards. Hardness testing quickly tells you how well a material is working and how well it has been heat-treated. Impact testing evaluates material resistance to brittle fracture under dynamic loading, particularly important for Class 600 RTJ flanges serving low-temperature applications. Mechanical test results documented in mill test reports provide objective evidence that components meet specified requirements.
Chemical Composition Analysis
Chemical analysis verifies that Class 600 RTJ flanges contain proper alloy content to deliver specified mechanical properties, corrosion resistance, and high-temperature performance. Carbon content critically affects strength and weldability characteristics, with typical specifications limiting carbon to 0.30% maximum for carbon steel flanges. Alloying elements including chromium, molybdenum, nickel, and vanadium distinguish various Class 600 RTJ flanges grades, with chrome-moly steels enhancing elevated temperature strength while stainless grades provide corrosion resistance. Chemical analysis methods including optical emission spectroscopy provide rapid composition determination, with results documented in mill test reports certifying compliance with specifications.
Conclusion
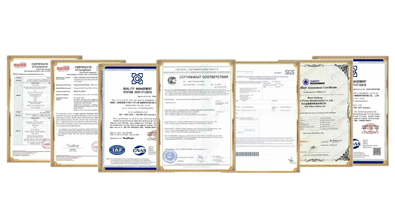
Ensuring quality when purchasing Class 600 RTJ flanges demands comprehensive verification of material certifications, dimensional accuracy, and rigorous testing protocols that confirm components meet application requirements. Buyers safeguard their assets and make sure their operations are secure by using systematic inspection techniques and checking the credentials of their suppliers.HEBEI RAYOUNG PIPELINE TECHNOLOGY CO., LTD. delivers Class 600 RTJ flanges manufactured under ISO 9001:2015 quality systems with complete traceability, GOST-R and SGS certifications.
FAQ
1. What certifications should Class 600 RTJ flanges include?
Class 600 RTJ flanges should include mill test reports documenting chemical composition and mechanical properties per ASTM standards, manufacturer certificates showing ASME B16.5 compliance, and ISO 9001:2015 quality system certifications.
2. How can I verify groove dimensions on Class 600 RTJ flanges?
Groove dimensions require precision measurement using specialized ring gages, depth micrometers, or coordinate measuring machines to verify diameter, depth, width specifications match ASME B16.20 requirements.
3. What non-destructive testing applies to Class 600 RTJ flanges?
Class 600 RTJ flanges commonly undergo liquid penetrant or magnetic particle testing for surface defect detection, with ultrasonic examination for internal flaw detection in critical applications.
4. Should I conduct pressure testing before installation?
Pressure testing of assembled Class 600 RTJ flanges connections validates installation quality and detects potential leakage. Hydrostatic testing at 1.5 times design pressure follows standard practice.
HEBEI RAYOUNG PIPELINE: Premium Class 600 RTJ Flanges Manufacturers
At HEBEI RAYOUNG PIPELINE TECHNOLOGY CO., LTD., we implement comprehensive quality control throughout production of Class 600 RTJ flanges, from raw material verification through final inspection and testing. As leading pipes and fittings manufacturers, our components undergo rigorous dimensional verification, non-destructive examination, and mechanical testing before shipment, with complete material traceability and certification packages documenting compliance with ASME B16.5, ISO 9001:2015, GOST-R, and SGS standards. We supply carbon steel, alloy steel, and stainless steel Class 600 RTJ flanges for petrochemical, power generation, and offshore applications where connection reliability is non-negotiable. Contact us at info@hb-steel.com to discuss your requirements.
References
1. American Society of Mechanical Engineers. (2021). Pipe Flanges and Flanged Fittings: NPS 1/2 through NPS 24 Metric/Inch Standard. ASME B16.5-2020, New York.
2. American Society of Mechanical Engineers. (2019). Boiler and Pressure Vessel Code, Section V: Nondestructive Examination. ASME BPVC-V-2019, New York.
3. American Society for Testing and Materials. (2020). Standard Specification for Carbon Steel Forgings for Piping Applications. ASTM A105/A105M-20, West Conshohocken.
4. European Committee for Standardization. (2018). Metallic Materials: Inspection Documents. EN 10204:2004, Brussels.
5. Parisher, R. A. & Rhea, R. A. (2021). Pipe Drafting and Design, Fourth Edition. Gulf Professional Publishing, Houston.
6. Smith, P. R. & Zappe, R. W. (2017). Valve Selection Handbook: Engineering Fundamentals for Selecting the Right Valve Design, Fifth Edition. Elsevier, Oxford.

Need a quote? Want to see samples? Just say hello. We’re friendly. We’re fast. And we’re ready when you are.
Welcome to RAYOUNG – Strong Pipes, Stronger Promise
